With Charmed Kubeflow, you have access to different AI/ML frameworks for your Jupyter notebooks. In order to access MindSpore within Charmed Kubeflow, you can use the natively enabled Mindspore and you’ll be all set!
Contents:
What is Mindspore?
MindSpore is a new open source deep learning training/inference framework that can be used for mobile, edge and cloud scenarios. It provides unified APIs and end-to-end AI capabilities for model development, execution, and deployment in all scenarios.
For more information, please refer to the Mindspore documentation.
Requirements
- Hardware resources: 16G RAM, 4vCPU and 400GB of disk
- Kubernetes 1.22 cluster
NOTE: Charmed Kubeflow with Mindspore requires a Kubernetes cluster with one x86 node for deploying Charmed Kubeflow and one arm64 node (preferably with the AI Ascend processor) for scheduling workers. Please refer to “Cluster with two nodes” to learn how to do the set up with Microk8s.
- Charmed Kubeflow 1.6 deployed in an x86 environment running and active
- Access to the Charmed Kubeflow dashboard
Cluster with two nodes
In order to explore Midspore’s capabilities on arm64 based architectures, you would need to perform some configurations in your Kubernetes cluster to be able to deploy Charmed Kubeflow and create workers correctly. This step is required as Charmed Kubeflow can only be deployed in x86 architectures. Please note the following instructions are Microk8s specific.
Create a Microk8s cluster with two nodes
The x86 node will be now referred as the primary node (this is where your Charmed Kubeflow deployment will live and will host the k8s control plane), and the arm64 node will be referred as the secondary node (this is where the workers will be scheduled).
- Install microk8s 1.22 in both PRIMARY and SECONDARY nodes:
sudo snap install microk8s --channel 1.22/stable --classic
- Add the secondary node to the Kubernetes cluster, run the following in the PRIMARY node:
microk8s add-node
This will return some joining instructions which should be executed on the MicroK8s instance that you wish to join to the cluster (NOT THE NODE YOU RAN add-node FROM) Please follow these instructions and verify you can list the recently added node. For more information on this step, please refer to Adding a node documentation.
Verify that your recently added node is listed.
microk8s kubectl get no
- Label your secondary node, run the following in the PRIMARY node:
microk8s kubectl label nodes <your-node-name> kubernetes.io/arch=arm64
Run Mindspore enabled Jupyter Notebooks
- Mindspore enabled Jupyter Notebooks are included in the
latest/edgeversion of the Charmed Notebook Operators. You are required to bump the charm to have access to Mindspore:
juju refresh jupyter-ui --channel=latest/edge
-
Once the charm is active and idle again, please access the Kubeflow dashboard and login.
-
Click on the “Notebooks” option from the menu and then click on “New notebook”
-
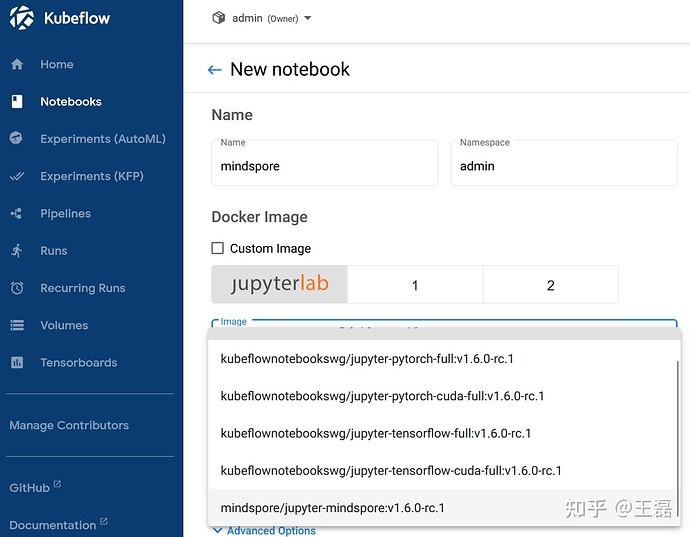
Select
mindspore/jupyter-mindspore:v1.6.0-rc.1from the drop down menu.
-
Fill in the blanks for the Name, allocate all other HW resources and click Create. Wait for the notebook server to be created, this could take a couple of minutes.
-
Click in the “Connect” option to have access to the Notebook server.
-
Once inside of the Notebook server, click on the + sign to create a new terminal and run the following to have a local clone of the demos repository:
git clone git@github.com:canonical/ai-ml-demos.git
- Go to
mindsporeDemo/and run themindspore.ipynb. The notebook contains steps to pull the MNIST dataset and train a model using Mindspore.


