
| Key | Value |
|---|---|
| Summary | Learn how to run Apache Spark on Kubernetes |
| Categories | kubeflow |
| Difficulty | 3 |
| Author | Bartolomiej Poniecki-Klotz |
Overview
Duration: 0:05
In this tutorial we will show you how to run Spark jobs on Kubernetes using the Juju Spark charm.
You will need a working Kubernetes cluster and the Juju client to get started.
Juju can be used with multiple Kubernetes platforms, but for this tutorial, we will use MicroK8s on Ubuntu.
sudo snap install microk8s --classic --channel=1.21/stable
sudo snap install juju --classic
juju bootstrap microk8s uk8s
juju add-model kubeflow
Deploy the Spark on Kubernetes charm
Duration: 0:05
Let’s deploy Spark – run the following command:
juju deploy spark-k8s spark
The Juju Spark charm should deploy. After a few moments, you should be able to see that its active by running juju status:
Unit                          Workload     Agent  Address       Ports                                   Message
spark/0*                  active       idle   10.1.108.121  10254/TCP,443/TCP
Running some experiments
Duration: 0:30
The next step is to run some examples. Clone the examples in the GitHub repository by running the following command:
git clone https://github.com/canonical/spark-operator.git
Run a Scala example calculating Pi in the Kubeflow namespace
Let’s first try to deploy a Spark job using a YAML file in the same namespace that Spark was deployed in. Run the following command:
microk8s.kubectl apply -f ./spark-operator/examples/spark-pi.yaml -n kubeflow
We can check the results of the Spark job by looking in the pod logs. Run the following command:
microk8s.kubectl logs spark-pi-driver -n kubeflow
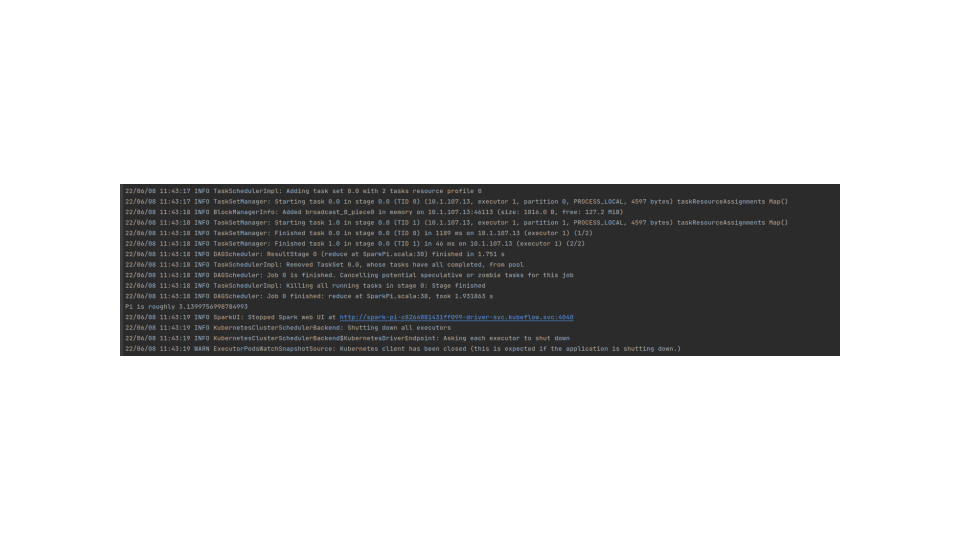
You should see an event in the logs, like Pi is roughly 3.1399756998784993. After this message, you should only see INFO events about closing the contexts and stopping the services.
Next, we’ll clean up the resources that we created, by running the following command:
microk8s.kubectl delete -f ./spark-operator/examples/spark-pi.yaml -n kubeflow
Run a Scala example calculating Pi in a custom namespace
Next we’ll run the same example, but in a custom Kubernetes namespace. Create a new namespace (you can skip this step if you already have a namespace that you want to use). Run the following command:
microk8s.kubectl create ns spark
We’ll first need to copy the service account from the kubeflow namespace into our custom namespace. Run the following command to do that now:
microk8s.kubectl get sa spark-k8s -n kubeflow -o yaml | sed 's/namespace: kubeflow/namespace: spark/' | microk8s.kubectl create -f -
Next, deploy the example and check the results, which should be exactly the same as in the previous experiment.
microk8s.kubectl apply -f ./spark-operator/examples/spark-pi.yaml -n spark
microk8s.kubectl logs spark-pi-driver -n spark
Run a PySpark Pi example in the ‘kubeflow’ namespace
We have seen that Scala Spark jobs are running nicely. The next experiment will run a Python-based, PySpark job to compute the value of Pi. So we’ll rerun the first experiment, but this time with a different example.
Important: Assuming that Spark was deployed in the kubeflow namespace, we will need to edit the YAML files to remove the namespace from each of the applied examples and just provide it at deployment time instead. Run the following commands:
curl https://raw.githubusercontent.com/GoogleCloudPlatform/spark-on-k8s-operator/master/examples/spark-py-pi.yaml | \
sed '/^  namespace: default$/d' | \
microk8s.kubectl apply -n kubeflow -f -
microk8s.kubectl logs spark-pi-driver -n kubeflow
Create a scheduled job
Duration: 0:10
In this step, we’ll set up a scheduled Spark job to run every five minutes. Run the following commands:
curl https://raw.githubusercontent.com/GoogleCloudPlatform/spark-on-k8s-operator/master/examples/spark-pi-schedule.yaml | \
sed '/^  namespace: default$/d' | \
microk8s.kubectl apply -n kubeflow -f -
Wait up to 5 minutes for the job to run, then check the logs from the driver by running the following command. Note that in the command below, <TIMESTAMP> is just a placeholder, the actual value will be different every time you launch the job.
microk8s.kubectl logs spark-pi–scheduled-<TIMESTAMP>-driver -n spark
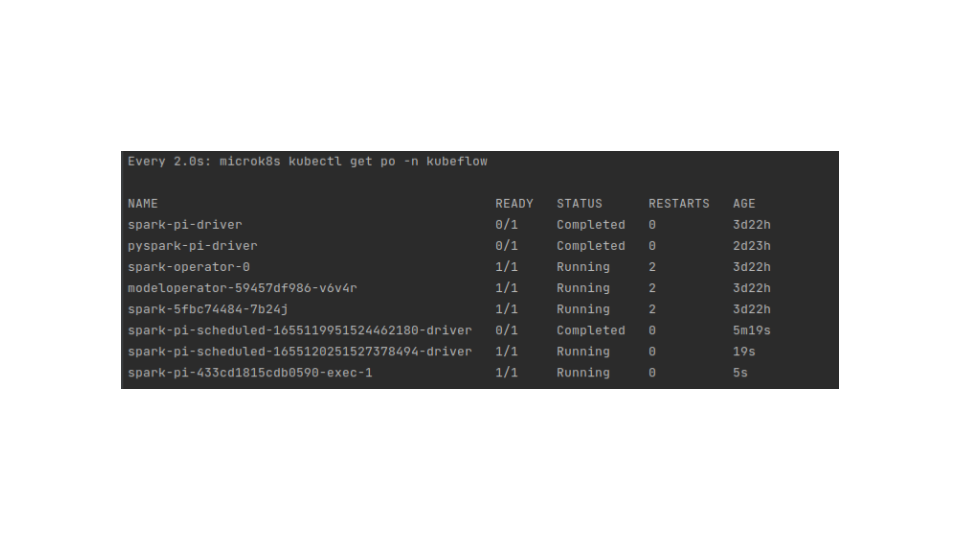
Check if the timestamp was changed in the pod name after 5 minutes. The new pod will replace the old one.
Below is a screenshot of the moment when the execution happened. You can use the command watch microk8s.kubectl get po -n kubeflow to see the effect:
Create a job with config variables and secret
Duration: 0:10
In this step, we’ll deploy a Spark job that uses variables and a secret. You could use this technique to supply your job with credentials to access data on a remote object store, for example. First we’ll create a config map and secret and then we’ll pass them to a Spark job. Run the following commands:
cat > spark-job-with-cm-and-secret.yaml <<EOF
apiVersion: v1
kind: ConfigMap
metadata:
  name: dummy-cm
data:
  super-public-val: "some-public-config-value"
---
apiVersion: v1
kind: Secret
metadata:
  name: mysecret
type: Opaque
data:
  username: YWRtaW4=
  password: MWYyZDFlMmU2N2Rm
---
apiVersion: "sparkoperator.k8s.io/v1beta2"
kind: SparkApplication
metadata:
  name: spark-pi
spec:
  type: Scala
  mode: cluster
  image: "gcr.io/spark-operator/spark:v3.1.1"
  imagePullPolicy: Always
  mainClass: org.apache.spark.examples.SparkPi
  mainApplicationFile: "local:///opt/spark/examples/jars/spark-examples_2.12-3.1.1.jar"
  sparkVersion: "3.1.1"
  restartPolicy:
    type: Never
  volumes:
    - name: config-vol
      configMap:
        name: dummy-cm
  driver:
    cores: 1
    coreLimit: "1200m"
    memory: "512m"
    labels:
      version: 3.1.1
    serviceAccount: spark
    volumeMounts:
      - name: config-vol
        mountPath: /opt/spark/mycm
    secrets:
      - name: mysecret
        path: /mnt/secrets
        secretType: Generic
  executor:
    cores: 1
    instances: 1
    memory: "512m"
    labels:
      version: 3.1.1
    volumeMounts:
      - name: config-vol
        mountPath: /opt/spark/mycm
EOF
microk8s.kubectl apply -f spark-job-with-cm-and-secret.yaml -nkubeflow
You should be able to validate that the job ran correctly in the same way as in the first experiment, just by having a look in the Spark job’s driver pod logs:
microk8s.kubectl logs spark-pi-driver -n spark
Conclusion
Duration: 0:01
In this tutorial we learned:
- How to set up a Kubernetes cluster on Ubuntu with MicroK8s
- How to configure your Kubernetes cluster for Spark jobs using Juju and the spark-k8s Juju charm
- How to run a Scala Spark job on a Kubernetes cluster and inspect the result
- How to run a Spark job in a custom Kubernetes namespace
- How to run a PySpark job on a Kubernetes cluster
- How to run a Spark job on a regular schedule on a Kubernetes cluster
- How to run a Spark job and provide it with configuration parameters in a Kubernetes ConfigMap and with Kubernetes secrets
We hope this tutorial was useful and that you were able to follow it without issues. But if you are having difficulties, feel free to drop into the forum to get in touch with the community.
Further reading
- MLOps Pipelines with MLFlow, Seldon Core and Kubeflow tutorial
- How to use Charmed Kubeflow with GPUs
- Visual workflow design with Charmed Kubeflow and Elyra tutorial
Have questions? Contact our sales team now.