
4. History Server
The Apache Spark History Server is a user interface to monitor the metrics and performance of completed and running Apache Spark applications. The History Server is offered as a charm in the Charmed Apache Spark solution, which can be deployed via Juju.
The Apache Spark History Server is most suitable for engineer running Spark jobs for troubleshooting, debugging, and general oversight. If you require a solution for systematic metrics capture and analysis with alerting, see the Canonical Observability Stack (COS) page of this tutorial.
Environment variables
At this step of the tutorial, you’ll need some environment variables that were set earlier during the environment setup. If you’ve restarted the VM and lost those variables, you can refresh them by running the following commands:
export ACCESS_KEY=$(kubectl get secret -n minio-operator microk8s-user-1 -o jsonpath='{.data.CONSOLE_ACCESS_KEY}' | base64 -d)
export SECRET_KEY=$(kubectl get secret -n minio-operator microk8s-user-1 -o jsonpath='{.data.CONSOLE_SECRET_KEY}' | base64 -d)
export S3_ENDPOINT=$(kubectl get service minio -n minio-operator -o jsonpath='{.spec.clusterIP}')
Initial setup
Let’s create a fresh Juju model for some experiments with the Apache Spark History Server.
juju add-model history-server
To enable monitoring via the Apache Spark History Server, we must first create a service account with the necessary configuration for Spark jobs to be able to store logs in an S3 bucket. We then need to deploy the History Server with Juju and configure it to read from the same S3 bucket that our Spark jobs write logs to.
Since Juju has already created the namespace history-server, when we added the model with that name, let’s create a new service account in this namespace.
We’ll reuse the configuration options from the existing spark service account and add a few more configuration parameters in order to tell Apache Spark where to store and retrieve the logs.
First, get config from the old service account (in the spark namespace) and store it in a file:
spark-client.service-account-registry get-config \
  --username spark --namespace spark > properties.conf
Add a few more configuration options for the storage of event logs:
echo "spark.eventLog.enabled=true" >> properties.conf
echo "spark.eventLog.dir=s3a://spark-tutorial/spark-events/" >> properties.conf
echo "spark.history.fs.logDirectory=s3a://spark-tutorial/spark-events/" >> properties.conf
Create a new service account (in the history-server namespace) and load configurations from the file:
spark-client.service-account-registry create \
  --username spark --namespace history-server \
  --properties-file properties.conf
We’ve configured Apache Spark to write logs to the spark-events path in the spark-tutorial bucket.
Now let’s create that directory in S3, since it doesn’t exist yet:
aws s3api put-object --bucket spark-tutorial --key spark-events/
Ensure the previous command ends with a / sign.
Next, deploy the spark-history-server-k8s charm into our Juju model:
juju deploy spark-history-server-k8s -n1 --channel 3.4/stable
The Apache Spark History Server needs to connect to the S3 bucket for it to be able to read the logs.
The credentials for this connection are provided to the Spark History Server charm by the s3-integrator charm.
Deploy the s3-integrator charm, configure it, set the credentials, and integrate with spark-history-server-k8s:
juju deploy s3-integrator
juju config s3-integrator bucket=spark-tutorial path="spark-events" endpoint=http://$S3_ENDPOINT
Wait a minute for the s3-integrator charm to deploy correctly before finishing the setup:
juju run s3-integrator/leader sync-s3-credentials \
  access-key=$ACCESS_KEY secret-key=$SECRET_KEY
juju integrate s3-integrator spark-history-server-k8s
Let’s view the status of the Juju model now with the command juju status --watch 1s --relations. Once deployment and integration have been completed for the charms, the status should look similar to the following:
Model           Controller      Cloud/Region        Version  SLA          Timestamp
history-server  spark-tutorial  microk8s/localhost  3.1.7    unsupported  07:29:35Z

App                       Version  Status  Scale  Charm                     Channel     Rev  Address         Exposed  Message
s3-integrator                      active      1  s3-integrator             edge         14  10.152.183.87   no
spark-history-server-k8s           active      1  spark-history-server-k8s  3.4/stable   15  10.152.183.111  no

Unit                         Workload  Agent  Address      Ports  Message
s3-integrator/0*             active    idle   10.1.29.167
spark-history-server-k8s/0*  active    idle   10.1.29.169

Integration provider               Requirer                                 Interface            Type     Message
s3-integrator:s3-credentials       spark-history-server-k8s:s3-credentials  s3                   regular
s3-integrator:s3-integrator-peers  s3-integrator:s3-integrator-peers        s3-integrator-peers  peer
The Spark History Server is now successfully configured to read logs from the S3 bucket.
Generating some logs
Let’s run a simple job so that Apache Spark can generate some logs for us to see with History Server. We’re going to use the same count-ubuntu.py example script we used earlier, which already exists in the spark-tutorial bucket:
spark-client.spark-submit \
    --username spark --namespace history-server \
    --deploy-mode cluster \
    s3a://spark-tutorial/count-ubuntu.py
Make sure to use the service account we have just created in the history-server namespace when submitting a job, otherwise the Spark Job will not be configured to write the logs to S3 and therefore History server won’t be able to display them.
Now that our S3-compliant storage has some logs, we can use History Server to explore them.
Web UI
The Spark History Server comes with a Web UI for users to view and monitor the Spark jobs submitted to the cluster.
Setup
The web UI can be accessed at port 18080 of the IP address of the spark-history-server-k8s/0 unit. However, it’s good practice to access it via a Kubernetes Ingress rather than directly accessing the unit’s IP address. Using an Ingress will allow us to have a common entrypoint to the applications running in the Juju model.
Let’s add an Ingress by deploying and integrating the traefik-k8s charm with spark-history-server-k8s:
juju deploy traefik-k8s --channel latest/stable --trust
juju integrate traefik-k8s spark-history-server-k8s
Now that Traefik has been deployed and configured, we can fetch the Ingress URL of the Spark History Server by running the show-proxied-endpoints action on the Traefik charm:
juju run traefik-k8s/0 show-proxied-endpoints
The output of that command should be similar to the following:
proxied-endpoints: '{"traefik-k8s": {"url": "http://10.181.60.89"}, "spark-history-server-k8s":
  {"url": "http://10.181.60.89/history-server-spark-history-server-k8s"}}'
Usage
Let’s open a web browser and navigate to the spark-history-server-k8s URL in order to see the Apache Spark History Server web UI, which should be similar to the one shown below:
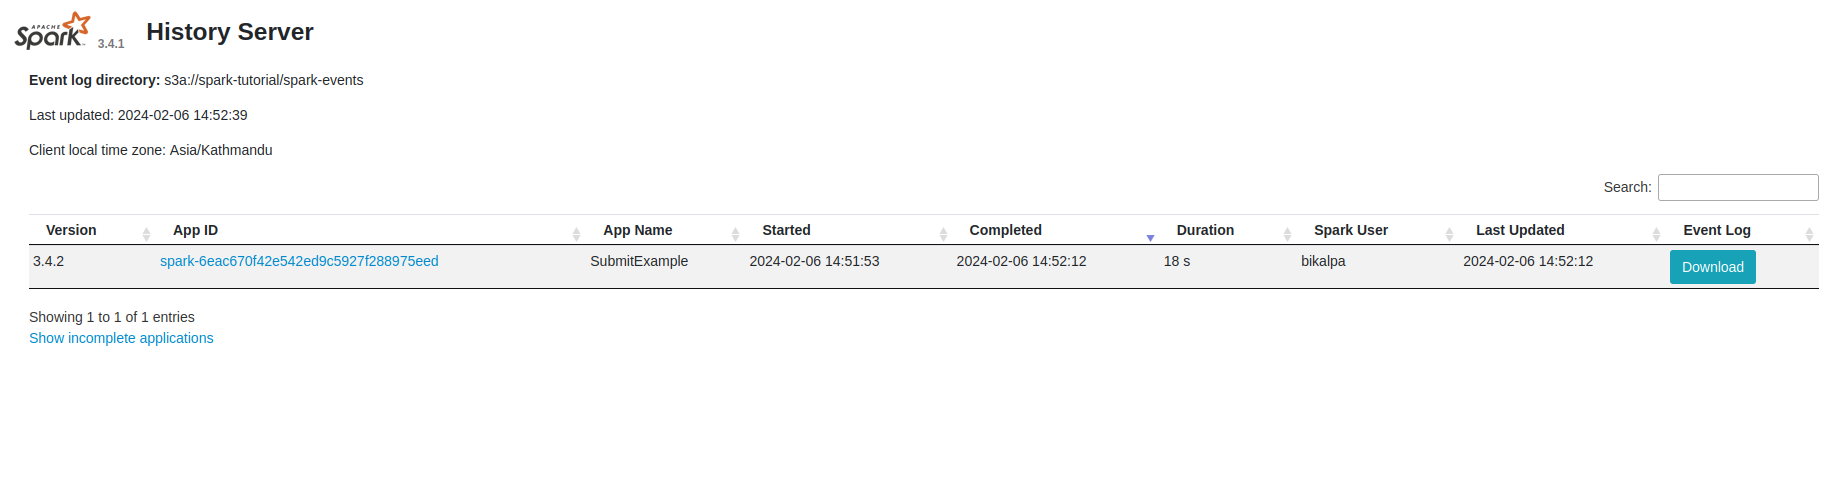
When you click on the application ID, you can see the event timeline for the particular Spark job and information about running and completed jobs:
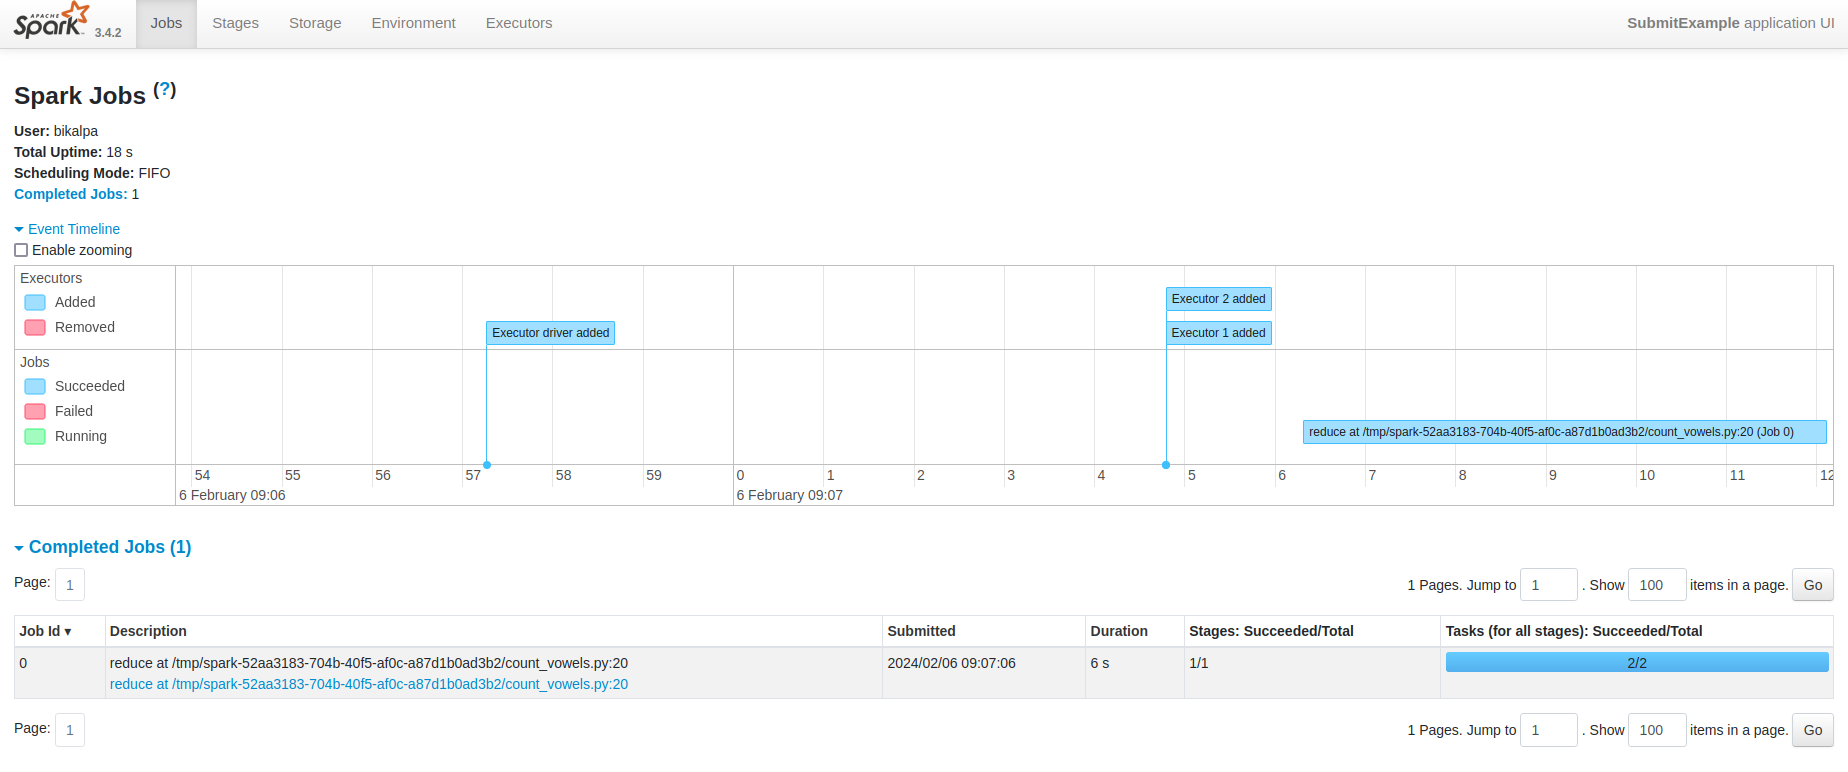
In a similar way, you can view information about various stages in the job by navigating to the “Stages” menu. The values of the different properties used to run the job can be viewed on the “Environment” page. Finally, you can also view statistics about the individual executors on the “Executors” page.
Try submitting more jobs and view their statuses and logs.