
This guide describes how to leverage FPGA-hardware with Kubernetes (K8s) for accelerating Machine Learning (ML) experiments.
Specifically, you will learn how to enable the InAccel FPGA Operator in MicroK8s to boost the hyperparameter tuning of some ML models using Charmed Kubeflow (CKF) Katib component.
The FPGA Operator is particularly useful for scenarios where the K8s cluster needs to scale quickly. For example provisioning additional FPGA nodes on the cloud and managing the lifecycle of the underlying software components.
Requirements
- Amazon EC2 F1 instance.
- A MicroK8s version >= 1.23 cluster running.
Enable InAccel FPGA Operator
InAccel FPGA Operator is already built into MicroK8s as an add-on. You can enable it after installing MicroK8s as follows:
microk8s enable inaccel --wait
Get started with Katib
Enable local storage
Your MicroK8s cluster must have dynamic volume provisioning for Katib. You can enable the local storage service as follows:
microk8s enable storage
Install Katib
- Install Juju, the operation lifecycle manager you will use it to deploy and manage Katib components. You can install it from a snap package:
sudo snap install juju --classic
- Create a Juju controller:
juju bootstrap microk8s
- Create the Katib model. A model in Juju matches with a K8s namespace:
juju add-model katib
- Deploy the Katib bundle.
juju deploy katib
- Create a namespace for running experiments, with Katib metrics collector enabled:
microk8s kubectl create namespace kubeflow
microk8s kubectl label namespace kubeflow katib-metricscollector-injection=enabled katib.kubeflow.org/metrics-collector-injection=enabled
Verify installation
Run the following command to verify that Katib components are running:
watch microk8s kubectl get --namespace katib pods
Access Katib UI
You can use the Katib User Interface (UI) to submit experiments and monitor results. The Katib home page looks like this:

You can set port-forwarding for the Katib UI service:
microk8s kubectl port-forward --namespace katib svc/katib-ui 8080:8080 --address 0.0.0.0
Now access the Katib UI at http://localhost:8080/katib.
Run an experiment
The steps to configure and run a hyperparameter tuning experiment in Katib are:
- Package your training code in a Docker container image and make the image available in a registry.
- Define the experiment in a YAML configuration file. The YAML file defines the range of potential values (the search space) for the parameters that you want to optimize, the objective metric to use when determining optimal values, the search algorithm to use during optimization, and other configurations.
- Run the experiment from the Katib UI, either by supplying the entire YAML file containing the configuration or by entering the configuration values into the form.
As a reference, see this FPGA XGBoost YAML file.
For this example, you will use the SVHN image dataset obtained from Google Street View.
Create the experiment
Click on NEW EXPERIMENT on the Katib home page with the following options:
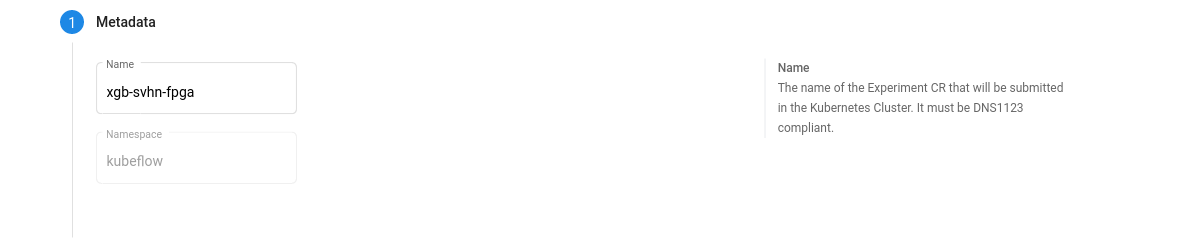
- Metadata. The experiment name, for example,
xgb-svhn-fpga.
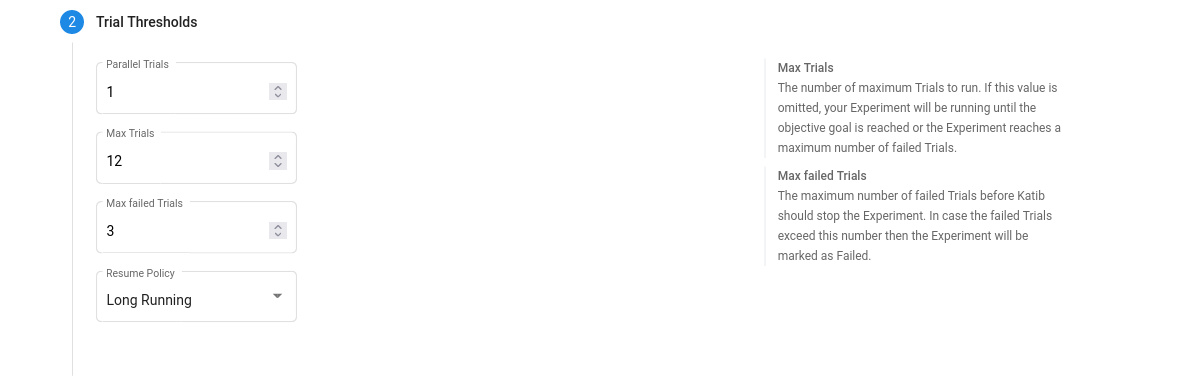
- Trial thresholds. Use
parallel trialsto limit the number of hyperparameter sets that Katib should train in parallel.
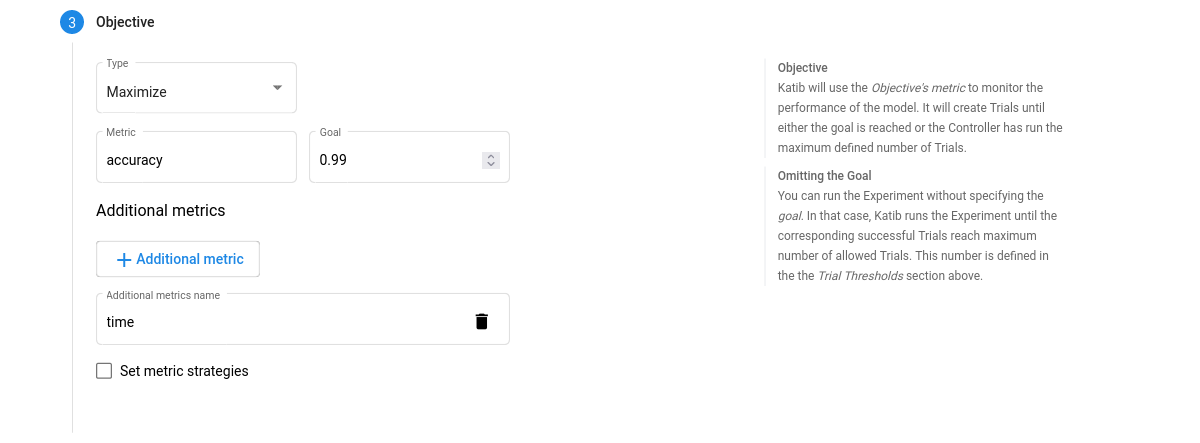
- Objective. The metric that you want to optimize. Use
Additional metricsto monitor how the hyperparameters work with the model.
- Hyperparameters. The range of potential values for the parameters that you want to optimize. In this section, you define the name and the distribution of every hyperparameter. For example, you may provide a minimum and maximum value or a list of allowed values for each hyperparameter. Katib generates hyperparameter combinations in the range.

- Trial template. You have to package your ML training code into a Docker image. Your training container can receive hyperparameters as command-line arguments or as environment variables.
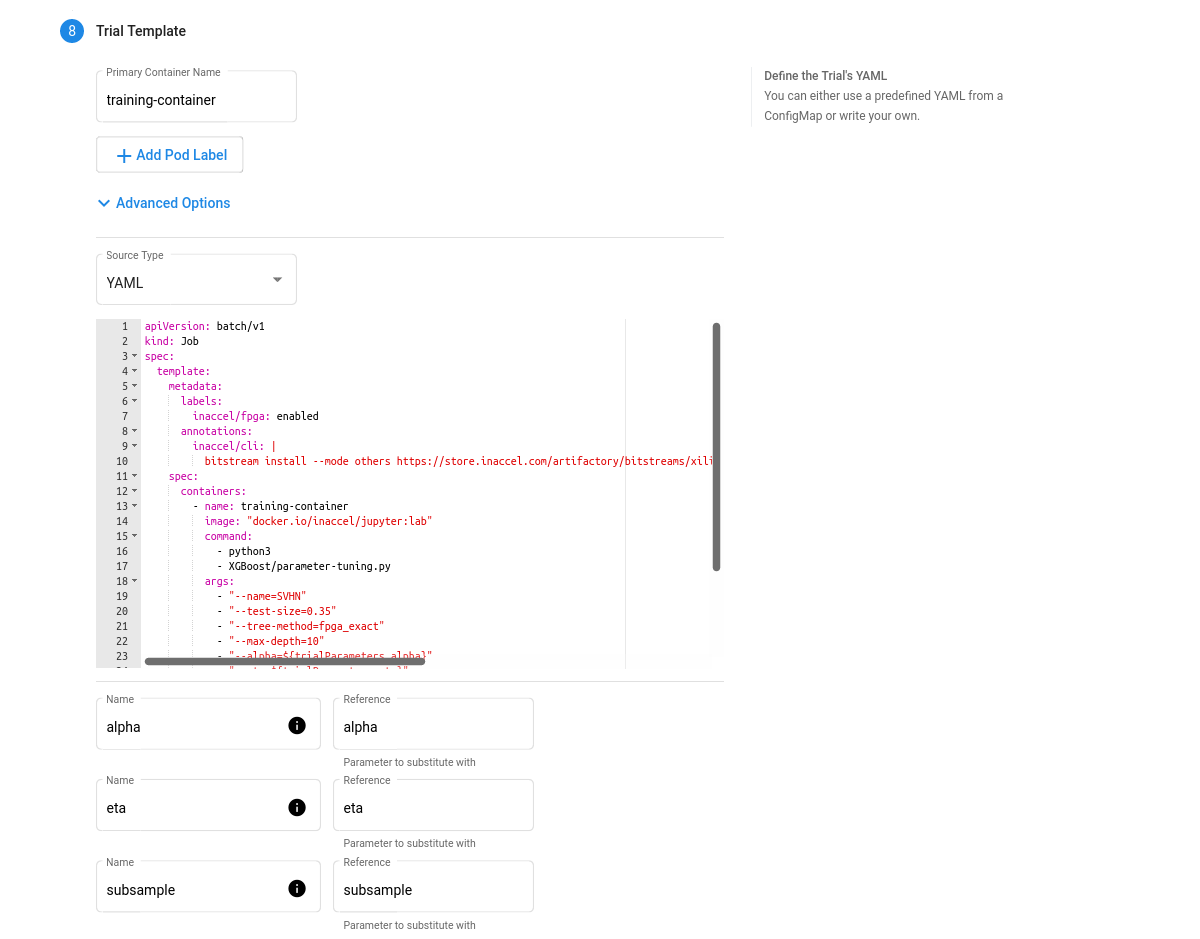
Here’s a YAML file example for a FPGA-accelerated trial job:
apiVersion: batch/v1
  kind: Job
  spec:
    template:
      metadata:
        labels:
          inaccel/fpga: enabled
        annotations:
          inaccel/cli: |
            bitstream install --mode others https://store.inaccel.com/artifactory/bitstreams/xilinx/aws-vu9p-f1/shell-v04261818_201920.2/aws/com/inaccel/xgboost/0.1/2exact
      spec:
        containers:
          - name: training-container
            image: "docker.io/inaccel/jupyter:lab"
            command:
              - python3
              - XGBoost/parameter-tuning.py
            args:
              - "--name=SVHN"
              - "--test-size=0.35"
              - "--tree-method=fpga_exact"
              - "--max-depth=10"
              - "--alpha=${trialParameters.alpha}"
              - "--eta=${trialParameters.eta}"
              - "--subsample=${trialParameters.subsample}"
            resources:
              limits:
                xilinx/aws-vu9p-f1: 1
        restartPolicy: Never
Here’s a YAML file example for a CPU-only trial job:
apiVersion: batch/v1
kind: Job
spec:
  template:
    spec:
      containers:
        - name: training-container
          image: "docker.io/inaccel/jupyter:lab"
          command:
            - python3
            - XGBoost/parameter-tuning.py
          args:
            - "--name=SVHN"
            - "--test-size=0.35"
            - "--max-depth=10"
            - "--alpha=${trialParameters.alpha}"
            - "--eta=${trialParameters.eta}"
            - "--subsample=${trialParameters.subsample}"
      restartPolicy: Never
Check the results
-
Go to the Katib UI to view the list of experiments. Select the
xgb-svhn-fpgaexperiment. -
See the results graph showing the level of validation accuracy and train time for various combinations of the hyperparameter values (alpha, eta, and subsample):
-
FPGA-accelerated:
-
CPU-only:
-
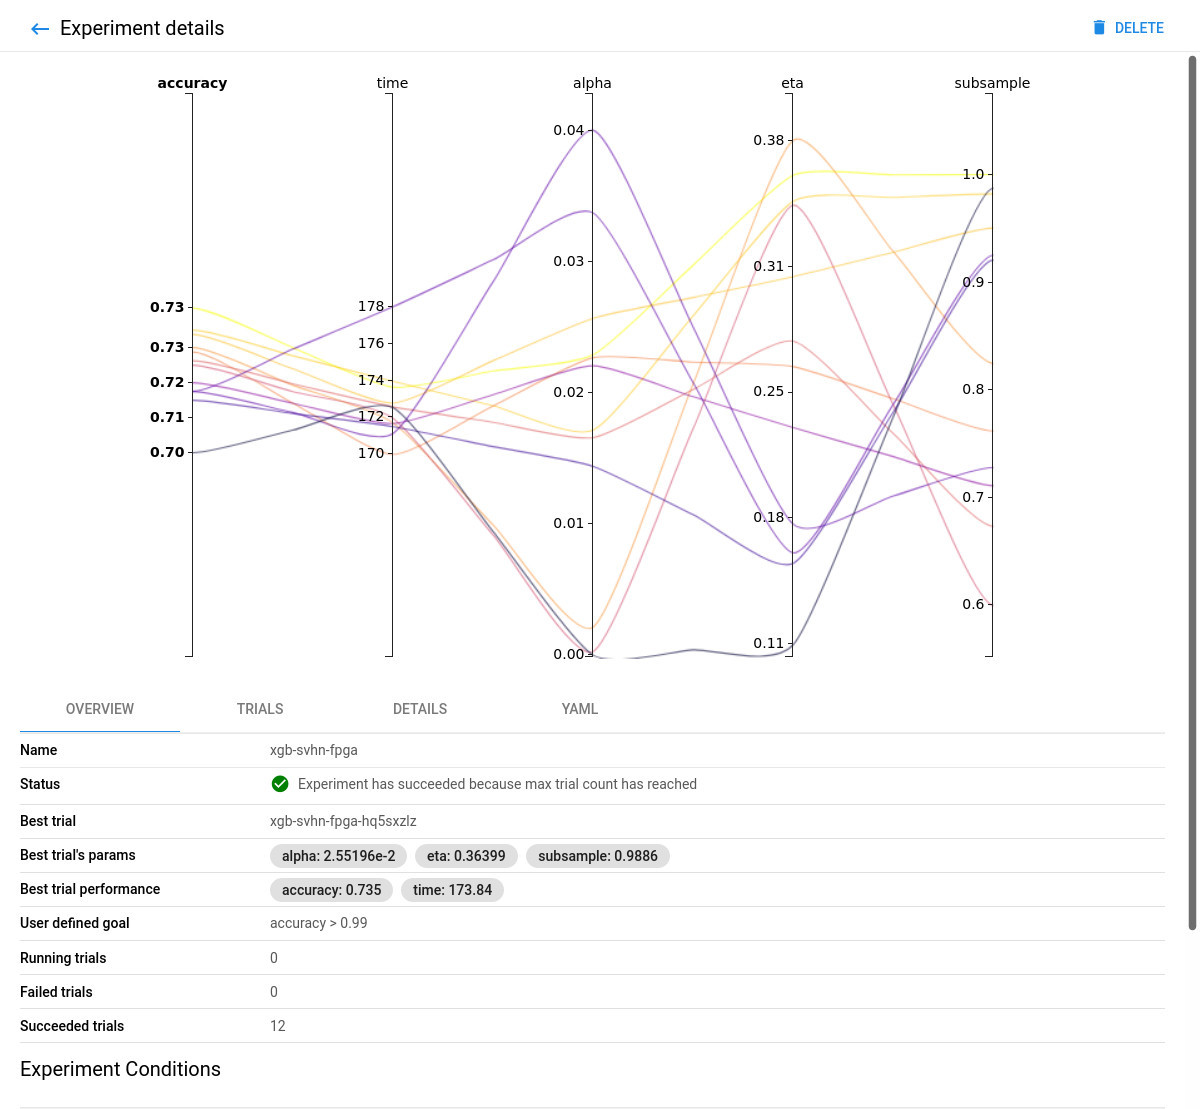
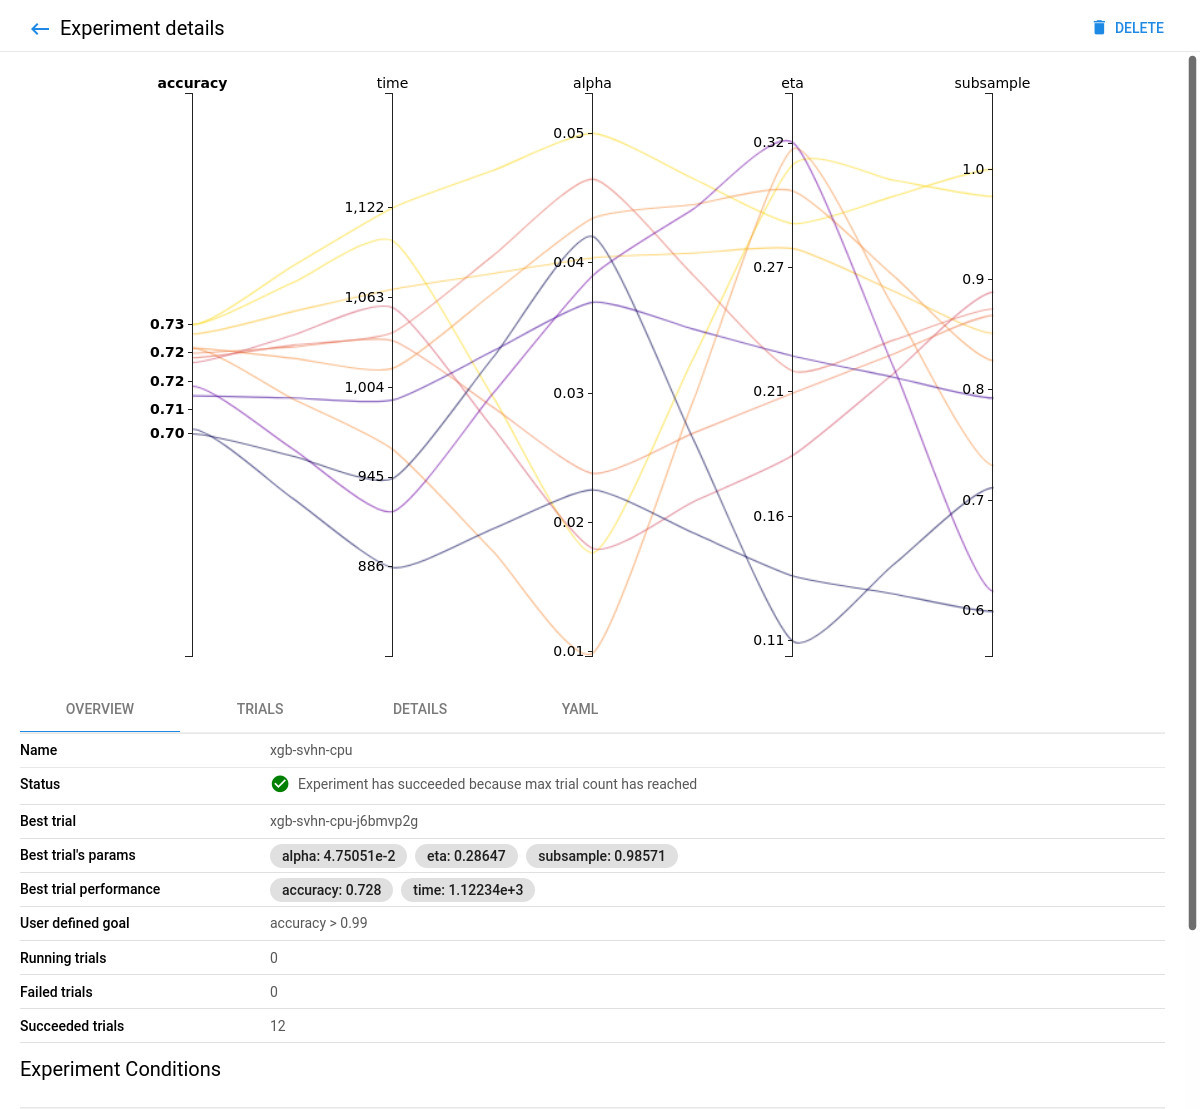
Comparing the FPGA-accelerated experiment with the equivalent CPU-only one, you will notice that the accuracy of the best model is similar in both implementations. However, the performance of the 8-core Intel Xeon CPU of the AWS F1 instance is significantly (~6 times) worse than its single (1) Xilinx VU9P FPGA for this use case.
Clean up resources
You can stop your FPGA instance as follows:
aws ec2 stop-instances \
    --instance-ids <InstanceId> \
| jq -r '.StoppingInstances[0].CurrentState.Name'