
This guide describes how to configure the Kubeflow Notebook creation page. This involves customising certain options available to users through the “New Notebook’’ User Interface (UI), such as suggested container images or GPU configurations.
This guide is intended for administrators.
Modify the suggested notebook images
The Notebook creation page includes dropdown lists of suggested container images for notebook servers:
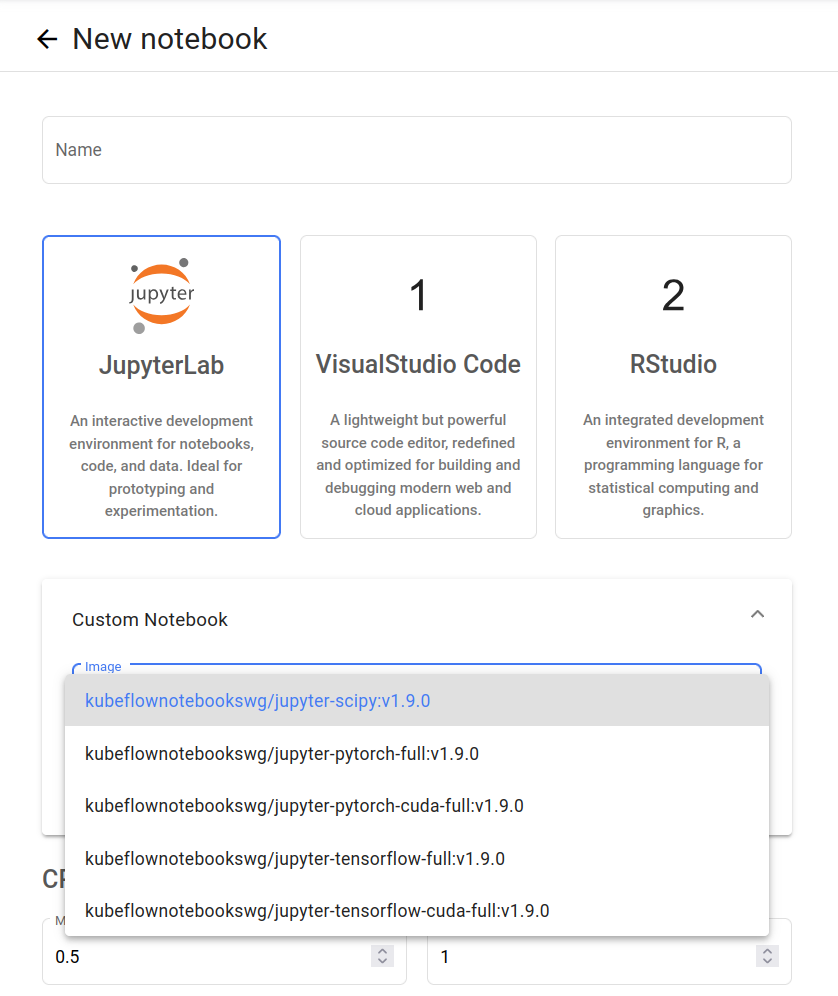
By default, these include standard images built by Canonical or the Kubeflow project and are grouped into Jupyterlab, VisualStudio Code, and RStudio images. As an administrator, you can modify these lists.
List available images
You can list the available images for Jupyterlab, VisualStudio Code, and RStudio images using juju config with the jupyter-ui charm as follows:
juju config jupyter-ui jupyter-images

juju config jupyter-ui vscode-images

juju config jupyter-ui rstudio-images
Configure images list
The jupyter-images, vscode-images, and rstudio-images configurations are YAML lists including image names. You can modify the default configuration by loading a new YAML file.
For example, define a file named images.yaml with the following contents:
- kubeflownotebookswg/jupyter-pytorch-full:v1.9.0
- kubeflownotebookswg/jupyter-tensorflow-full:v1.9.0
- bitnami/jupyter-base-notebook:4.1.5
All image names must be available from where your notebook image deploys.
Now, pass this configuration file to Juju by running:
juju config jupyter-ui jupyter-images=@images.yaml
You can customise vscode-images and rstudio-images using the same way.
Modify the existing list of images
Setting juju config updates the entire configuration, rather than modifying the existing one. If you want to do so, for example, adding a new notebook image to your current configuration, you have to export the current config to a file, edit it, and import it back:
juju config jupyter-ui jupyter-images > images_v1.yaml

# edit images_v1.yaml, save as images_v2.yaml

juju config jupyter-ui jupyter-images=@images_v2.yaml
GPU configurations
Kubeflow Notebooks can use any GPU resources available in the Kubernetes cluster. You can configure the type and number of GPU resources available to users.
Charmed Kubeflow (CKF) exposes this configuration to administrators through the following items:
gpu-vendors: The GPU vendors that are selectable by users in the “New Notebook” UI when creating a notebook. The input can be in JSON or YAML format with key values. See the upstream configuration file for more details:limitsKey: the key that corresponds to the GPU vendor resource in Kubernetes.uiName: the name to be shown in the UI for this GPU.
gpu-vendors-default: The GPU vendor that is selected by default in the “New Notebook” creation page when creating a notebook. This must be one of thelimitsKeyvalues from the gpu-vendors config.gpu-number-default: The number of GPUs that are selected by default in the “New Notebook” UI when creating a notebook.
gpu-vendors-default can be left as an empty string to select no GPU vendor by default.
Users see these in the dropdown menus:

To set the list for available GPU resources, run:
juju config jupyter-ui gpu-vendors='[{"limitsKey": "intel.com/gpu", "uiName": "Intel"}, {"limitsKey": "nvidia.com/gpu", "uiName": "NVIDIA"}, {"limitsKey": "amd.com/gpu", "uiName": "AMD"}]'
The command above overwrites the previous configuration, so all fields have to be specified.
For example, you can set the default notebook to use two NVIDIA GPUs as follows:
juju config jupyter-ui gpu-number-default 2
juju config jupyter-ui gpu-vendors-default nvidia.com/gpu
Node Affinities
You can configure Kubeflow Notebooks to use Node Affinities when scheduling the notebook within the cluster. For instance, this can be used to assign notebooks to a specific node type, avoiding scheduling more than one notebook on a given node.
CKF exposes this configuration to administrators through the following items:
affinity-options: The Node Affinity configurations that are selectable by users in the “New Notebook” UI when creating a notebook. The input can be in JSON or YAML format with key values. See the upstream configuration file for more details:configKey: an arbitrary key for the configuration.displayName: the name shown in the “New Notebook” UI.affinity: the affinity configuration, as defined by Kubernetes YAML.
affinity-options-default: TheconfigKeyof the affinity to be chosen by default. Leave it as an empty string to select no affinity by default.
Users see these options from the dropdown menu:

To change these settings, for example, if your cluster has east and west availability zones defined by node labels and you want users to be able to choose them, you have to modify the default configuration by creating a new YAML file and passing it to Juju.
First, create affinity_config.yaml file as follows:
- configKey: "az_us-east1"
  displayName: "Availability Zone us-east1"
  affinity:
    nodeAffinity:
      requiredDuringSchedulingIgnoredDuringExecution:
        nodeSelectorTerms:
          - matchExpressions:
            - key: topology.kubernetes.io/zone
              operator: In
              values:
                - us-east1
- configKey: "az_us-west1"
  displayName: "Availability Zone us-west1"
  affinity:
    nodeAffinity:
      requiredDuringSchedulingIgnoredDuringExecution:
        nodeSelectorTerms:
          - matchExpressions:
            - key: topology.kubernetes.io/zone
              operator: In
              values:
                - us-west1
Now, set the configuration, where the az_us-west1 is chosen by default:
juju config jupyter-ui affinity-options=@affinity_config.yaml
juju config jupyter-ui affinity-options-default="az_us-west1"
Use Pod tolerations
You can configure Kubeflow Notebooks to use Pod tolerations when scheduling the notebook within the cluster. For instance, this can be used to allow a notebook to be scheduled to a specific node, such as a node that uses GPU or some other special resource.
CKF exposes this configuration to administrators through the following items:
tolerations-options: The tolerations configurations that are selectable by users in the “New Notebook” UI when creating a notebook. The input can be JSON or YAML format with key values. See the upstream configuration file for more details:groupKey: an arbitrary key for the configuration.displayName: the name shown in the “New Notebook” UI.tolerations: the toleration configuration, as defined by Kubernetes YAML.
tolerations-options-default: ThegroupKeyof the toleration to be chosen by default. Leave it as an empty string to select no toleration by default.
Users see these options from the dropdown menu:

To change the tolerations options for your cluster, you have to modify the default configuration by creating a new YAML file and passing it to Juju.
First, create the tolerations_config.yaml file:
- groupKey: "group_1"
  displayName: "4 CPU 8GB at ~$0.50 USD per day"
  tolerations:
    - key: "dedicated"
      operator: "Equal"
      value: "kubeflow-c5.xlarge"
      effect: "NoSchedule"

- groupKey: "group_2"
  displayName: "8 CPU 16GB at ~$1.20 USD per day"
  tolerations:
    - key: "dedicated"
      operator: "Equal"
      value: "kubeflow-c5.xxlarge"
      effect: "NoSchedule"
Use juju config to set the configuration for the toleration:
juju config jupyter-ui tolerations-options=@tolerations_config.yaml
juju config jupyter-ui tolerations-options-default=""
If the value tolerations-options-default is an empty string, then no toleration is selected by default.
Create default configurations with PodDefaults
You can use PodDefaults to inject common data and/or configuration to several notebooks at the same time. PodDefaults is a namespaced custom resource that defines the configuration to be overlaid on a Pod. Each user has access only to the PodDefaults defined in their own namespace. Users can create their own PodDefaults. Administrators can provide PodDefaults to users by adding them to the user’s namespaces.
Kubeflow Notebooks can be configured to use PodDefaults through the “New Notebook” UI. This can be used, for example, to automatically inject credentials for an MLflow or S3 store. These configurations can be chosen by the user during the notebook creation.
CKF exposes this configuration to administrators through the following items:
default-poddefaults: The PodDefaults that are selected for the user by default in the “New Notebook” UI when creating a notebook. The input can be in JSON or YAML format as a list of PodDefaults names. See the upstream configuration file for more details.
Users see these options in the dropdown menu:

To change this default configuration, use the juju config command:
juju config jupyter-ui default-poddefaults='["add-s3-credentials", "add-mlflow-credentials"]'