
As you may already know, the 12-Factor project provides OpenID Connect support via the oauth relation. Following a recent blog post on deploying a Spring Boot application to production using 12-Factor tools and Juju, we now want to show how to add OpenID Connect (OIDC) to the mix—more specifically, to the spring-petclinic application. The 12-Factor tooling uses the oauth relation to provide a simple way for applications to obtain OIDC credentials.
spring-petclinic does not support OIDC out of the box, so in this post we will show how to adapt spring-petclinic to authenticate using OIDC and create the charm for it, very similar to the original blog post. We will then deploy the Canonical Identity Platform stack and test the spring-petclinic with our own Identity Provider. Quite a daunting task.
Set up a developer machine with Canonical K8s and Juju
We will use Multipass to create a full working example. We will need a relatively big machine:
multipass launch --cpus 8 --disk 50G --memory 16G --name oidcpost 24.04
multipass shell oidcpost
Let’s now use concierge to install all the tools we need. Besides that, we will update the load balancer to serve as a subnet under the machine’s main IP, so we can have several load balancer services, and install an OCI image registry:
sudo snap install --classic concierge
sudo concierge prepare -p k8s --charmcraft-channel latest/edge --extra-snaps terraform --extra-debs default-jdk

LB_CIDR=$(ip -4 -j route get 2.2.2.2 | jq -r '.[] | .prefsrc')
LB_CIDR=${LB_CIDR%.*}.16/28

# This could collide with other Multipass VMs. Adapt it if needed.
sudo k8s set load-balancer.cidrs=${LB_CIDR}

curl https://raw.githubusercontent.com/canonical/spring-petclinic/refs/heads/resources/registry.yaml | kubectl apply -f -
Prepare spring-petclinic
Clone the spring-petclinic repository:
git clone https://github.com/canonical/spring-petclinic.git
cd spring-petclinic
Now we need to update the spring-petclinic app to use OpenID Connect. You can go the fast track, getting it from the oidc branch (Option 1), or do it yourself (Option 2).
Option 1: Get the adapted Spring-petclinic to login using OIDC
Get the updated version of spring-petclinic from the oidc branch, with minimal adaptations to work with OIDC. If you want to see the changes over the original app, you can follow them in the section “Option 2”.
git checkout oidc
Option 2: Adapt spring-petclinic to login using OIDC
Add the file src/main/java/org/springframework/samples/petclinic/PetClinicSecurityConfig.java:
package org.springframework.samples.petclinic;

import org.springframework.context.annotation.Bean;
import org.springframework.context.annotation.Configuration;
import org.springframework.security.config.Customizer;
import org.springframework.security.config.annotation.web.builders.HttpSecurity;
import org.springframework.security.web.SecurityFilterChain;

@Configuration
public class PetClinicSecurityConfig {

	@Bean
	public SecurityFilterChain filterChain(HttpSecurity http) throws Exception {
		http.authorizeHttpRequests(authorize -> authorize.anyRequest().authenticated())
			.oauth2Login(Customizer.withDefaults());
		return http.build();
	}
}
As we will use self-signed certificates, we will let spring-petclinic to trust all certificates. This change is NOT recommended for a production deployment, and should only be used in development and testing environments. Update src/main/java/org/springframework/samples/petclinic/PetClinicApplication.java to:
package org.springframework.samples.petclinic;

import java.security.KeyManagementException;
import java.security.NoSuchAlgorithmException;
import java.security.cert.CertificateException;
import java.security.cert.X509Certificate;

import javax.net.ssl.HostnameVerifier;
import javax.net.ssl.HttpsURLConnection;
import javax.net.ssl.SSLSession;
import javax.net.ssl.TrustManager;
import javax.net.ssl.X509TrustManager;
import javax.net.ssl.SSLContext;

import org.springframework.boot.SpringApplication;
import org.springframework.boot.autoconfigure.SpringBootApplication;
import org.springframework.context.annotation.ImportRuntimeHints;

@SpringBootApplication
@ImportRuntimeHints(PetClinicRuntimeHints.class)
public class PetClinicApplication {

	public static void main(String[] args) throws KeyManagementException, NoSuchAlgorithmException {
		PetClinicApplication.disableSslVerification();
		SpringApplication.run(PetClinicApplication.class, args);
	}

	public static void disableSslVerification() throws NoSuchAlgorithmException, KeyManagementException {
		TrustManager[] trustAllTrustManager = new TrustManager[] { new X509TrustManager() {
			public java.security.cert.X509Certificate[] getAcceptedIssuers() {
				return new X509Certificate[] {};
			}

			@Override
			public void checkClientTrusted(X509Certificate[] chain, String authType) throws CertificateException {
			}

			@Override
			public void checkServerTrusted(X509Certificate[] chain, String authType) throws CertificateException {
			}
		} };

		SSLContext sc = SSLContext.getInstance("SSL");
		sc.init(null, trustAllTrustManager, new java.security.SecureRandom());

		HttpsURLConnection.setDefaultSSLSocketFactory(sc.getSocketFactory());
		HostnameVerifier allHostsValid = new HostnameVerifier() {
			@Override
			public boolean verify(String hostname, SSLSession session) {
				return true;
			}
		};
		HttpsURLConnection.setDefaultHostnameVerifier(allHostsValid);
	}
}
You may need to run ./mvnw spring-javaformat:apply locally if you did not format the Java files correctly.
A few changes are needed in the pom.xml file. Add the spring-boot-starter-oauth2-client dependency, under /project/dependencies in the pom.xml file:
    <dependency>
      <groupId>org.springframework.boot</groupId>
      <artifactId>spring-boot-starter-oauth2-client</artifactId>
    </dependency>
Disable the tests, since we updated the source code but not the tests. You should add your own tests if you want to build a solid, future proof application, but for this simple example we will just disable them. Under /project/build/plugins in the pom.xml file add:
      <plugin>
        <groupId>org.apache.maven.plugins</groupId>
        <artifactId>maven-surefire-plugin</artifactId>
        <version>3.5.4</version>
        <configuration>
          <skipTests>true</skipTests>
        </configuration>
      </plugin>
We do not use the maven-checkstyle-plugin to check our charm code. For the execution of the nohttp-checkstyle-validation, exclude the check for the charm directory. Add to the list of excludes the value**/charm/**/* in the nohttp-checkstyle-validation plugin:
<plugin>
  <groupId>org.apache.maven.plugins</groupId>
...
  <executions>
...
    <execution>
      <id>nohttp-checkstyle-validation</id>
...
      <excludes>**/.git/**/*,**/.idea/**/*,**/target/**/,**/.flattened-pom.xml,**/*.class,**/charm/**/*</excludes>
...
    </execution>
...
  </executions>
...
</plugin>
We could use either Maven or Gradle to build the application, but for this example we will use Maven. From the spring-petclinic directory, remove the Gradle artifacts and initialize the rockcraft project:
rm -rf build.gradle gradlew gradle
Prepare the rock for spring-petclinic
Let’s prepare a rock - a compliant OCI image - for the application.
rockcraft init --profile spring-boot-framework
Add at the end of rockcraft.yaml, add the jlink extra module jdk.crypto.ec. This module is needed as is the default cryptography provider:
parts:
  spring-boot-framework/runtime:
    jlink-extra-modules: [jdk.crypto.ec]
Pack the rock and upload it to the OCI registry :
ROCKCRAFT_ENABLE_EXPERIMENTAL_EXTENSIONS=True rockcraft pack

rockcraft.skopeo copy --insecure-policy --dest-tls-verify=false oci-archive:spring-petclinic_0.1_amd64.rock docker://localhost:32000/spring-petclinic:0.1
At this point we have a fully compliant OCI image. But to fully integrate with the Juju ecosystem we need a charm.
Create the charm
mkdir charm
cd charm
charmcraft init --profile spring-boot-framework --name spring-petclinic
We want to use PostgreSQL instead of an in-memory database. We also want to integrate with Hydra through the oauth interface for OpenID connect. Add the following lines to the charmcraft.yaml file:
requires:
  postgresql:
    interface: postgresql_client
    optional: false
    limit: 1
  oidc:
    interface: oauth
    optional: false
    limit: 1
And we are ready to create a charm. Pack it:
CHARMCRAFT_ENABLE_EXPERIMENTAL_EXTENSIONS=True charmcraft pack
Let’s test it
At this point we have a charm for spring-petclinic that will integrate seamlessly with PostgreSQL and Hydra.
juju add-model spring-petclinic

juju deploy ./spring-petclinic_amd64.charm spring-petclinic --resource app-image=localhost:32000/spring-petclinic:0.1

juju config spring-petclinic app-profiles=postgres
Deploy PostgreSQL and integrate it with spring-petclinic:
juju deploy postgresql-k8s --trust
juju integrate spring-petclinic postgresql-k8s
Deploy the Canonical Identity Platform using Terraform:
cd ~
git clone https://github.com/canonical/iam-bundle-integration.git
cd iam-bundle-integration
git checkout v1.0.1
terraform -chdir=examples/tutorial init
terraform -chdir=examples/tutorial apply -auto-approve -var "kratos={config={enforce_mfa=false}}"
Integrate spring-petclinic with Hydra and expose it also using the same public Traefik instance as Canonical IDP:
juju offer core.traefik-public:ingress traefik-ingress
juju integrate spring-petclinic admin/core.traefik-ingress
juju integrate spring-petclinic admin/iam.oauth-offer
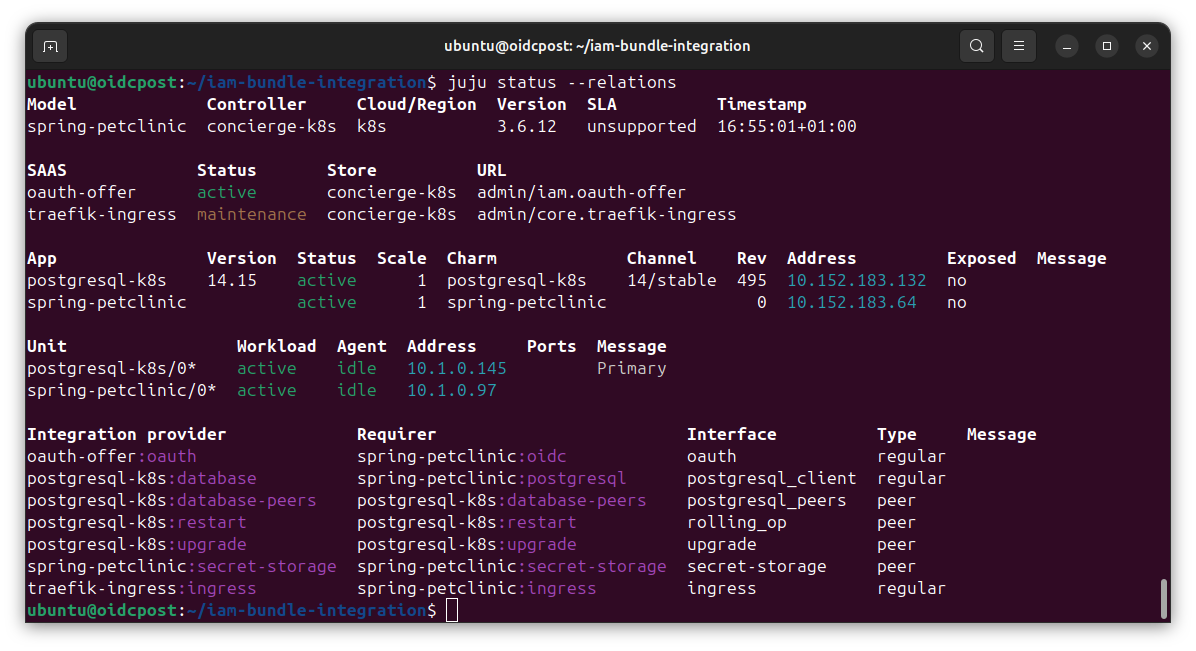
We are close. After a while all the applications should be active. You can check the current state with juju status:
Once all units are active, prepare the credentials to access the web page. Create an admin account and update the password (otherwise the account will not be ready).
juju run -m iam kratos/0 create-admin-account email=test@example.com password=adminpassword username=admin

SECRET_ID=$(juju add-secret -m iam admin-password password=newadminpassword)

juju grant-secret -m iam ${SECRET_ID} kratos

juju run -m iam kratos/0 reset-password email=test@example.com password-secret-id=${SECRET_ID}
At this point we can use the spring-petclinic application. You can get the URL of the application with:
juju run -m core traefik-public/0 show-proxied-endpoints

Open the spring-petclinicURL with your browser. It will redirect you to the login page. You can login with user test@example.com and password newadminpassword.

You can navigate freely in the spring-petclinic app.

The application is running in a Kubernetes cluster, with Trafik acting as an ingress. spring-petclinic is now using PostgreSQL to store its data. Charmed PostgreSQL K8s has provided credentials for the database to the spring-petclinic application, and it’s ready to be operated in a production-grade environment.
You have also added OpenID Connect authentication. There are many steps that you can take from here:
-
Deploy your charm to Charmhub and use terraform for the full deployment, not just Canonical Identity Platform.
-
Require authentication to only some paths of the application.
-
Show the user information from the OpenID token or from the information from the UserInfo Endpoint.
-
Restrict some paths to certain users using claims from the subject.