
Introduction
Charmed Kubeflow is an open-source, end-to-end, production-ready MLOps platform on top of cloud native technologies.
NVIDIA NeMo is an end-to-end, cloud-native framework to build, customize, and deploy generative AI models anywhere. It includes training and inferencing frameworks, guardrailing toolkits, data curation tools, and pretrained models, offering enterprises an easy, cost-effective, and fast way to adopt generative AI.
NVIDIA Triton™ Inference Server is open-source software that standardizes AI model deployment and execution across every workload.
Outline
During this workshop, you will learn how to use Nvidia NeMo and Nvidia Triton with Charmed Kubeflow. You will run an end-to-end example. A recording of the workshop will be later available.
At the end of this you will learn how to use Nvidia’s NeMo pre-trained Megatron models, adjust them to your needs using P-tuning methods and then set-up a production grade deployment using Charmed Kubeflow and Kubernetes powered by NVidia GPUs.
Minimum requirements:
- 64GB of RAM
- NVidia GPU with 8GB or VRAM
- Ubuntu 20.04 or higher
Use Nvidia NeMo with Charmed Kubeflow
Get started locally on Ubuntu
You can get started on your own machine, on Ubuntu, and scale as needed using public clouds or on-prem deployments.
Update Ubuntu itself
$ sudo apt full-upgrade --yes

$ sudo apt autoremove --yes

$ sudo apt autoclean --yes

$ sudo reboot
Install development tools
$ sudo apt install build-essential pkg-config cmake cmake-qt-gui ninja-build valgrind -y

$ sudo apt install python3 python3-wheel python3-pip python3-venv python3-dev python3-setuptools -y
Configure your Git
$ sudo apt install git

$ git config --global user.name "Name"

$ git config --global user.email "name@domain.com"
Install GPU drivers and CUDA
$ sudo ubuntu-drivers autoinstall

$ sudo apt install linux-headers-$(uname -r)

$ wget https://developer.download.nvidia.com/compute/cuda/11.8.0/local_installers/cuda_11.8.0_520.61.05_linux.run

$ sudo sh cuda_11.8.0_520.61.05_linux.run --override

$ export PATH=$PATH:/usr/local/cuda-11.8/bin

$ export LD_LIBRARY_PATH=$LD_LIBRARY_PATH:/usr/local/cuda-11.8/lib64:/usr/local/cuda-11.8/extras/CUPTI/lib64
Test it
$ nvidia-smi
Add cuDNN
$ sudo dpkg -i cudnn-local-repo-ubuntu2204-8.6.0.163_1.0-1_amd64.deb

$ sudo cp /var/cudnn-local-repo-ubuntu2204-8.6.0.163/cudnn-local-FAED14DD-keyring.gpg /usr/share/keyrings/

$ sudo apt update

$ sudo apt install libcudnn8

$ sudo apt install libcudnn8-dev

$ sudo apt install libcudnn8-samples # Optional

### Install Conda

$ wget https://repo.anaconda.com/miniconda/Miniconda3-latest-Linux-x86_64.sh

$ chmod +x Miniconda3-latest-Linux-x86_64.sh

$ ./Miniconda3-latest-Linux-x86_64.sh

$ source ~/miniconda3/bin/activate

$ conda config --set auto_activate_base false

$ conda deactivate
Prep environment
$ conda create -n llm python=3.11

$ conda install torch torchaudio numpy scipy pandas scikit-learn matplotlib jupyterlab

$ conda install -c "nvidia/label/cuda-12.1.1" cuda-toolkit

$ CMAKE_ARGS="-DLLAMA_CUBLAS=on" FORCE_CMAKE=1 pip install llama-cpp-python --no-cache-dir --force
Open Jupyter
jupyter lab
Scale easily with Kubeflow on Kubernetes
Deploy Charmed Kubeflow
Install Kubeflow and follow this guide.
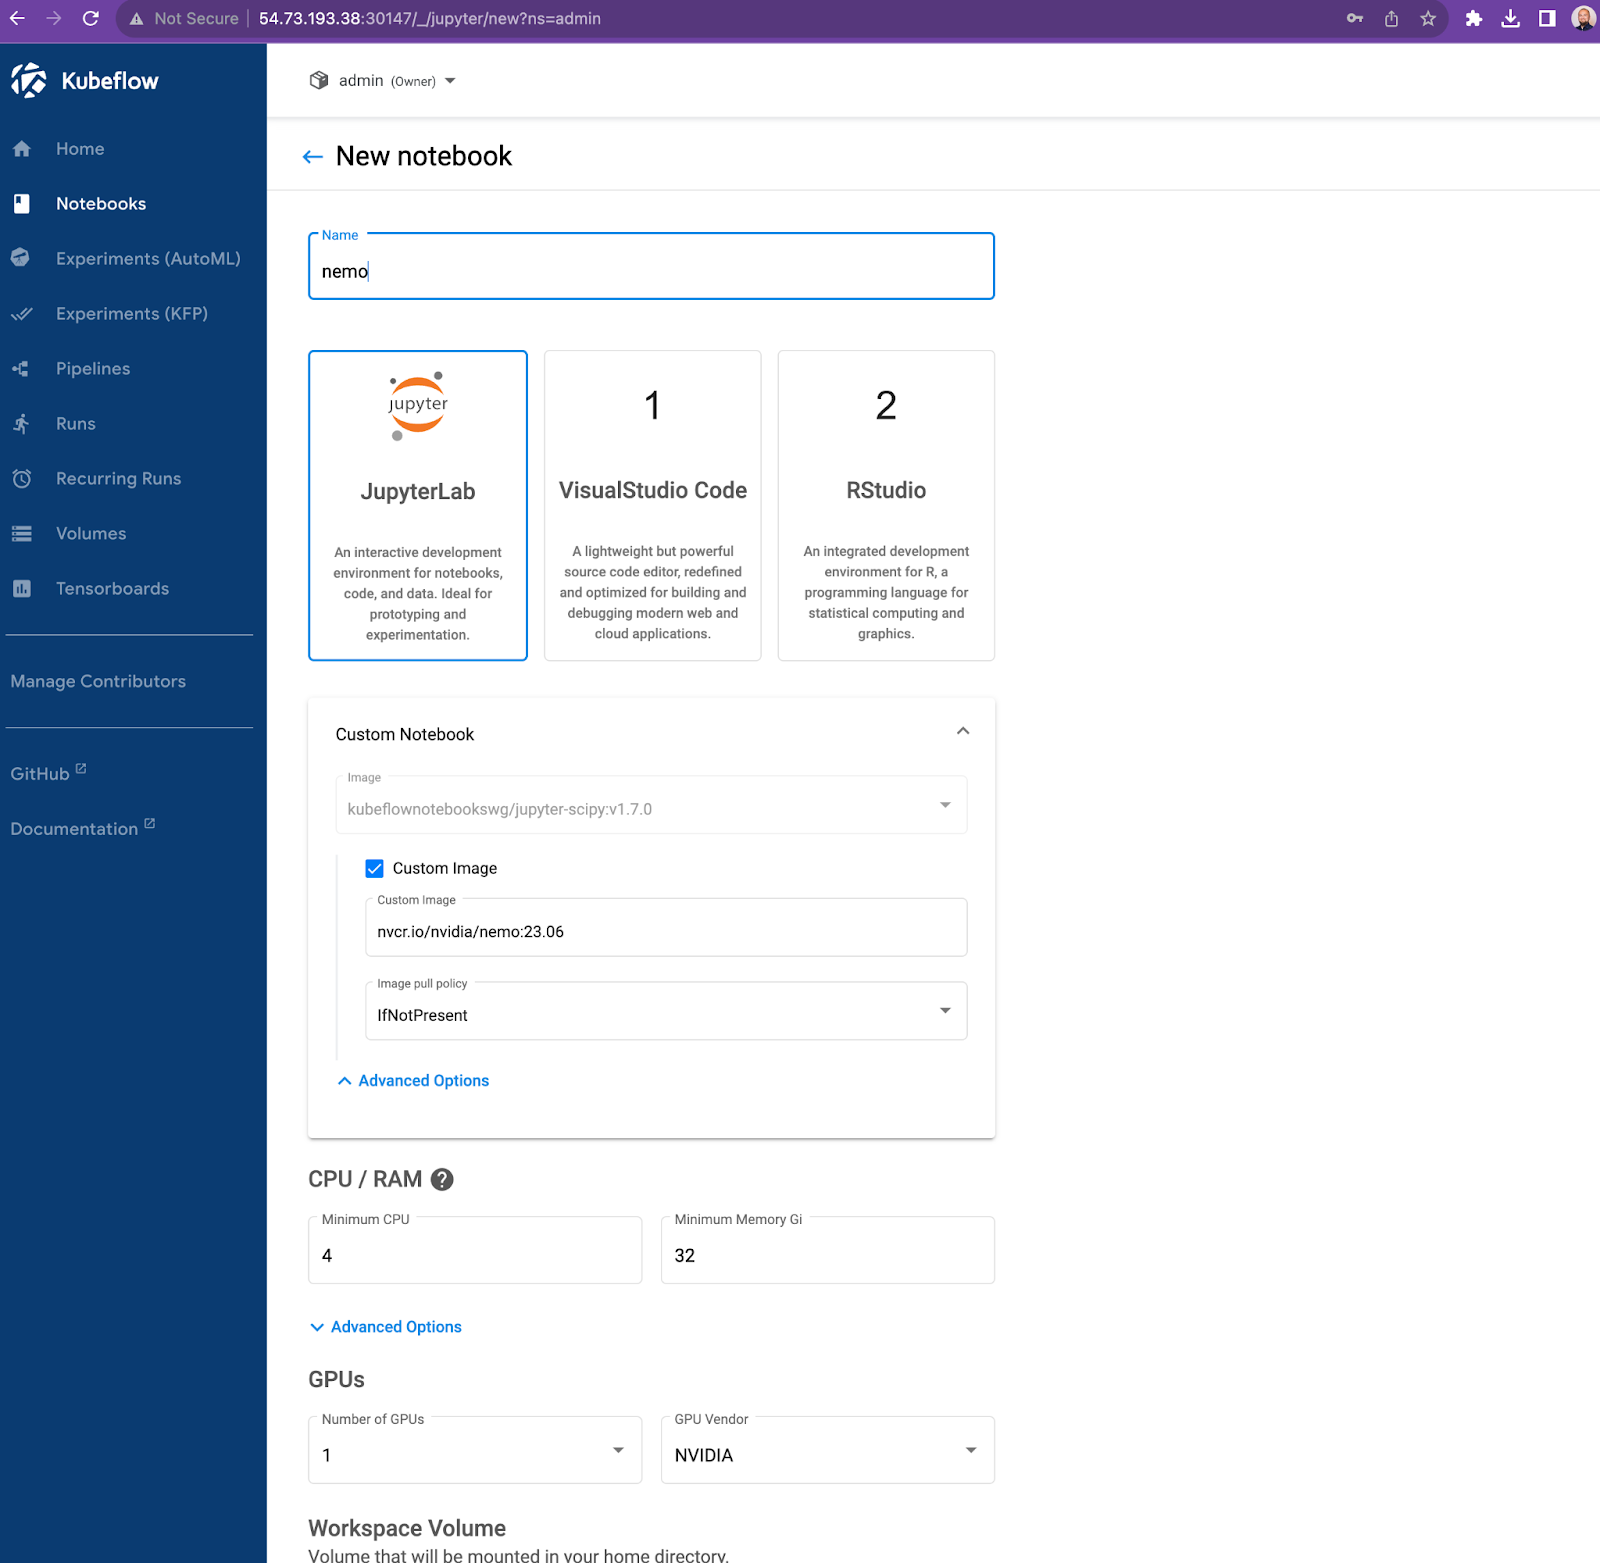
Once installed, you need to create a Notebook using nvcr.io/nvidia/nemo:23.06
Hint: If you are on Charmed Kubeflow version 1.7 or lower you also need to apply a following poddefaults in your namespace, from 1.8 forward it’s not needed anymore
kubectl edit poddefaults -n <YOUR NAMESPACE>
And fill it in with:
apiVersion: kubeflow.org/v1alpha1
kind: PodDefault
metadata:
  name: ngc
spec:
  args:
  - lab
  - --notebook-dir='/workspace'
  - --ip=0.0.0.0
  - --no-browser
  - --allow-root
  - --port=8888
  - --ServerApp.token=''
  - --ServerApp.password=''
  - --NotebookApp.token=''
  - --NotebookApp.password=''
  - --ServerApp.allow_origin='*'
  - --ServerApp.authenticate_prometheus=False
  - --ServerApp.base_url="$(NB_PREFIX)"
  - --NotebookApp.base_url="$(NB_PREFIX)"
  command:
  - jupyter
  desc: Enable NGC support
  selector:
    matchLabels:
      ngc: "true"
Use Kubeflow Notebooks
Open the newly created Kubeflow Notebook. Clone the Notebook and continue with the instructions described there.
If you don’t have a powerful enough machine and still prefer working from your own IDE you can follow this tutorial: Remote VS Code on public cloud
Use Nvidia Triton with Charmed Kubeflow
Setup
Before we proceed, we need to make a few changes to our K8s cluster in order to accommodate for Triton Inference Server:
- Skip tag resolution for nvcr.io which requires auth to resolve triton inference server image digest:
kubectl patch cm config-deployment --patch '{"data":{"registriesSkippingTagResolving":"nvcr.io"}}' -n knative-serving
- Increase progress deadline since pulling a Triton image can take a while:
kubectl patch cm config-deployment --patch '{"data":{"progressDeadline": "600s"}}' -n knative-serving
Create Triton InferenceService
To run Triton with KServe, we need to create an InferenceService capable of serving multiple models on GPU. We will request a single GPU, but can later expand this to multiple.
- Create
multi_model_triton.yamlwith the following content:
apiVersion: "serving.kserve.io/v1beta1"
kind: "InferenceService"
metadata:
  name: "triton-mms"
spec:
  predictor:
    triton:
      args:
      - --log-verbose=1
      resources:
        limits:
          cpu: "8"
          memory: 16Gi
          nvidia.com/gpu: 1
        requests:
          cpu: "8"
          memory: 16Gi
          nvidia.com/gpu: 1
- Apply the InferenceService:
kubectl apply -f multi_model_triton.yaml
- Check the InferenceService status:
kubectl get isvc triton-mms

NAME URL READY PREV LATEST PREVROLLEDOUTREVISION LATESTREADYREVISION AGE
triton-mms http://triton-mms-default.example.com True 5m56s